Showing posts with label Dotting Tool. Show all posts

Sunday, 26 January 2014

CND Shellac Nail Art - Diagonal French and Polka Dots


Aaaah, it feels good to get back into the nail-art-swing of things. I kick-started the 2014 nail art with Rachel (best known for these and these) and a take on one of cutepolish's designs.

If you haven't already come across cutepolish (where have you been hiding?!) then check out her YouTube channel, her Instagram and her Twitter to keep up to date on loads of fabulous nail art ideas and how-to's.

Rachel brought the design to me from a google search and after a little more hunting it didn't take me long to find it on cutepolish's channel - http://www.youtube.com/watch?v=KXd_nxlEuKA


We changed it up slightly though - pink dots on a white tip and a lilac glitter line instead of purple - and recreated it in CND Shellac of course. So what colours did I use?...

After base coat I used one coat of Negligee then two coats of Cream Puff for the diagonal French tip.

To get an even line on all nails I used striping tape to guide me for the line on the first coat of white so all nails looked roughly the same - don't forget to remove the tape before curing! - and then I free-handed the second coat of white over the top. It doesn't matter if the line isn't that neat as you will go over it with glitter in a little while.

After curing the white I used a medium/large ended dotting tool to add polka dots in Pink Bikini (if you don't have a dotting tool, the end of a hair grip is a similar size). Once the dots were cured I then added a lilac glitter line - using a glitter paste of Mother of Pearl and Gosh nail glitter in 13 Topaz Lavender - cured the glitter and finally added top coat.


What do you think?

Most Gosh Nail Glitters are available from Superdrug in the UK for £4.99 (only the 02 Gold is online, the other colours are all in store). 


Disclaimer - I be not professional, just well practised but if you want more info about my CND Shellac hobby obsession then check out my disclaimer page here. What's not to like about a manicure that actually lasts?!

Monday, 30 December 2013

CND Shellac Christmas Nail Art - #8 Rudolph and Gingerbread Men

It seems that Ruby Ritz well and truly made a comeback this season. With its re-release as part of a duo with Wildfire it was a natural choice for many to get that glitzy Christmas manicure - including myself!

Natalie took one look at my manicure and decided that was the colour for her, but she one step further and challenged me to some appropriately festive characters...


These two, adorable, designs were inspired by a couple of google images that Natalie had found. After a bit more research, I found the sweet little gingerbread man stitched to this cute cushion from Miss Shelley Designs at notonthehighstreet.com.

Gingerbread Man Cushion from notonthehighstreet.com £25
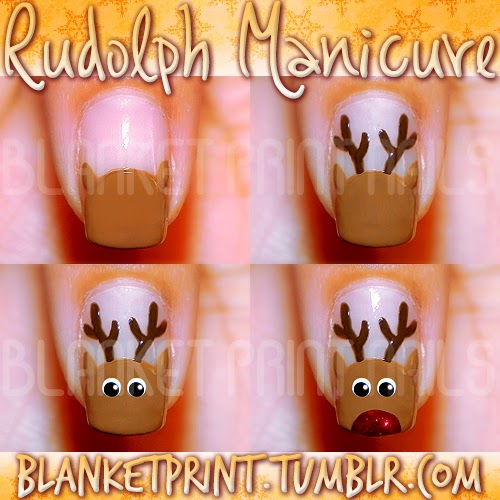
And Rudolph is actually a tutorial from the talented Joya's tumblr page (aka Blanket Print Nails). You can see here full post here.

tutorial by Joya at blanketprint.tumblr.com
To recreate this manicure in CND Shellac I used:

Red nails - one coat of Red Baroness followed by one coat of Ruby Ritz
White base colour for the characters - two coats of Studio White followed by one coat of Silver VIP Status
(the light brown used for the gingerbread man and Rudolph is made from a mixture of Faux Fur and Cocoa)
Gingerbread man - two coats of the light brown mixture in the shape of the gingerbread man, then use a dotting tool to add eyes in Faux Fur and buttons in Cream Puff, then the bow tie is one like the red base colour on the other nails (Red Baroness and Ruby Ritz)
Rudolph - follow the tutorial above (making sure to cure between each colour application) using the light brown mix for Rudolph, Faux Fur for the antlers, Cream Puff and Blackpool for the eyes, Red Baroness and Ruby Ritz for the nose.

All nails were finished with a layer of top coat and voila! What do you think? I can't decide if Rudolph or the Gingerbread man is my favourite...


Disclaimer - I purchased all the products used for this manicure myself, and if you want more info about myself and CND Shellac then check out my disclaimer page here. What's not to like about nail art that actually lasts?!

CND Shellac Christmas Nail Art - #7 Charmed Collection Dotticure

Back in October I posted about the new CND Shellac limited edition Christmas 'Charmed' collection and as I'm sure you all guessed, it didn't take me long to add them to my stash! Then the perfect opportunity came to try them all out.... Check out these beauties:


This is Maddie and her Christmas manicure of choice for 2013 or should I say 'dotticure'. We were inspired by a design from Hannah at The Nail Trail that she did in OPI nail polish (I think!):

photo from @thenailtrail on instagram
Although I can't find the design on her website, it was on her instagram (@thenailtrail) and you can find the exact post here or here.

To recreate this in CND Shellac we managed to use the entire Charmed collection, plus a few others:
The base colour is two coats of Studio White followed by one coat of Silver VIP Status.
The dots for the Christmas tree are Frosted Glen and Serene Green and the dots on the other nails are Frosted Glen, Serene Green, Scarlet Letter, Ice Vapor and Tinsel Toast. To create the different sized dots I used two different dotting tools - the Orly Dotter Duo and CND dotting tool that came with the original additives kit.
To the top of each Christmas tree I added silver star glequin from the Born Pretty Store and I finished off by adding top coat.


This is hands down, one of my favourite (if not the favourite) Christmas designs so far! What do you think?
Disclaimer - I purchased all the products used for this manicure myself, and if you want more info about myself and CND Shellac then check out my disclaimer page here. What's not to like about nail art that actually lasts?!

Friday, 26 July 2013

CND Shellac Nail Art - Purple Chevrons


You might have spotted my current manicure (above) on my instagram last weekend - this was another inspiration idea taken from a couple of my favourite instagrammers for nail art ideas.

The exact design I found was one of Hannvjk's (below) also known as @polishcandies who took the famous 'chevron' design from Selena at @selenadee_nails

Hannvjk used Essie brooch the subject, a neon pink from Claire's and China Glaze I'm not a lion for this design
(photo courtesy of @polishcandies on instagram)
I love her neon and nude combination, but until Shellac create a good nude, that combination isn't going to work for me. So I went purple and silver instead.

The colours I used were Lilac Longing, Grape Gum, and a Gosh nail glitter in Silver (available from Superdrug stores).

For the glitter on the middle finger and thumb, I mixed the Gosh glitter with Shellac in Mother of Pearl and applied 3 coats so it was truly opaque. For the other fingers, I used a base of Lilac Longing (again 3 coats) and then Grape Gum for the dots and chevron detail.

And yes, those chevrons were handpainted.... bloody difficult to paint my right hand too!


What do you think? I'm already thinking how I can mix up the colour combo for next time...
Disclaimer - All products used for this manicure were bought myself, for more info about myself and CND Shellac please check out my disclaimer page here. Once you Shellac you never go back!

CND Shellac Nail Art - Nautical Nails


Aye aye Cap'n! You may have spotted me donning a rather nautical themed outfit and hat a couple of weeks back on my instagram. They were in aid of my friend Rachel's nautical themed hen party, ahead of her impending nuptials at the end of August.

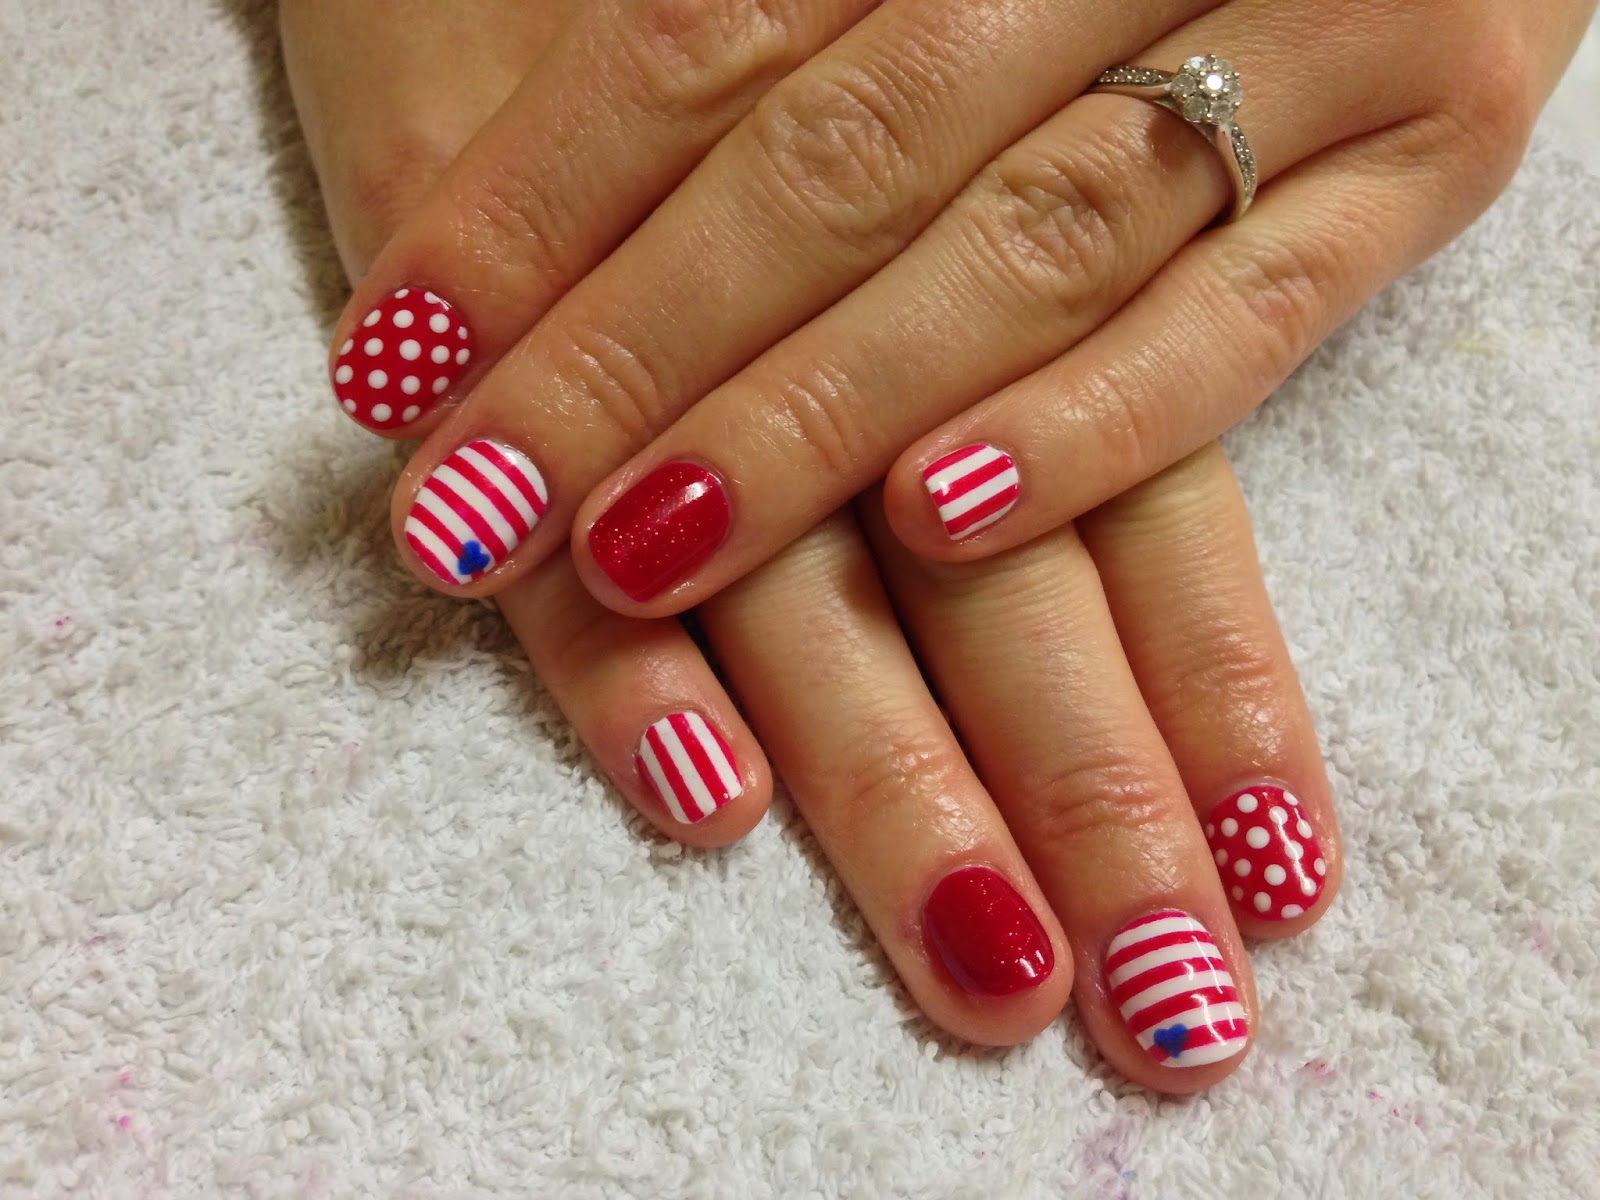
So of course for the hen's nails, she needed something truly appropriate to the theme. And not just one design, she went all out with a mix'n'match red and white theme.


The colours I used to create this were Hollywood, Ruby Ritz, Cream Puff and Water Park.
It's probably easiest if I breakdown what I did on each nail individually:
Thumb - Hollywood with two 1.5mm round gold studs (from eBay)
Index - Hollywood base with Cream Puff polka dots
Middle - Cream Puff base, horizontal stripes in Hollywood and a blue heart in Water Park
Ring - Hollywood base with Ruby Ritz over the top
Little - Cream Puff base and vertical stripes in Hollywood

To create the stripes I cheated a little and used some striping tape (from eBay) as a stencil and the polka dots were just done with a small dotting tool. The heart was free handed using my dotting tool and a small detailer brush.

What do you think?

Disclaimer - All products used for this manicure were bought myself, for more info about myself and CND Shellac please check out my disclaimer page here. Once you Shellac you never go back!

CND Shellac Nail Art - Strawberry Roses


Happy Summer Holidays people! Now that school's out for the Summer I can get on with showing you some of the more recent nail art adventures I've been on. If you follow my instagram (@brushupmakeup) you may have spotted this manicure a couple of weeks back. This is Becca and she likes to challenge me on the odd occasion....

Becca picked out a design she's seen from the lovely chorubim on instagram (@chorubim) - a very talented nail artist and swatcher who has the neatest set of talons I have ever seen! The original design that inspired me was this one (link):

chorubim used Zoya Neely, OPI MVIB and Wet'n'Wild Tickled Pink for this design
(photo courtesy of @chorubim on instagram)
  
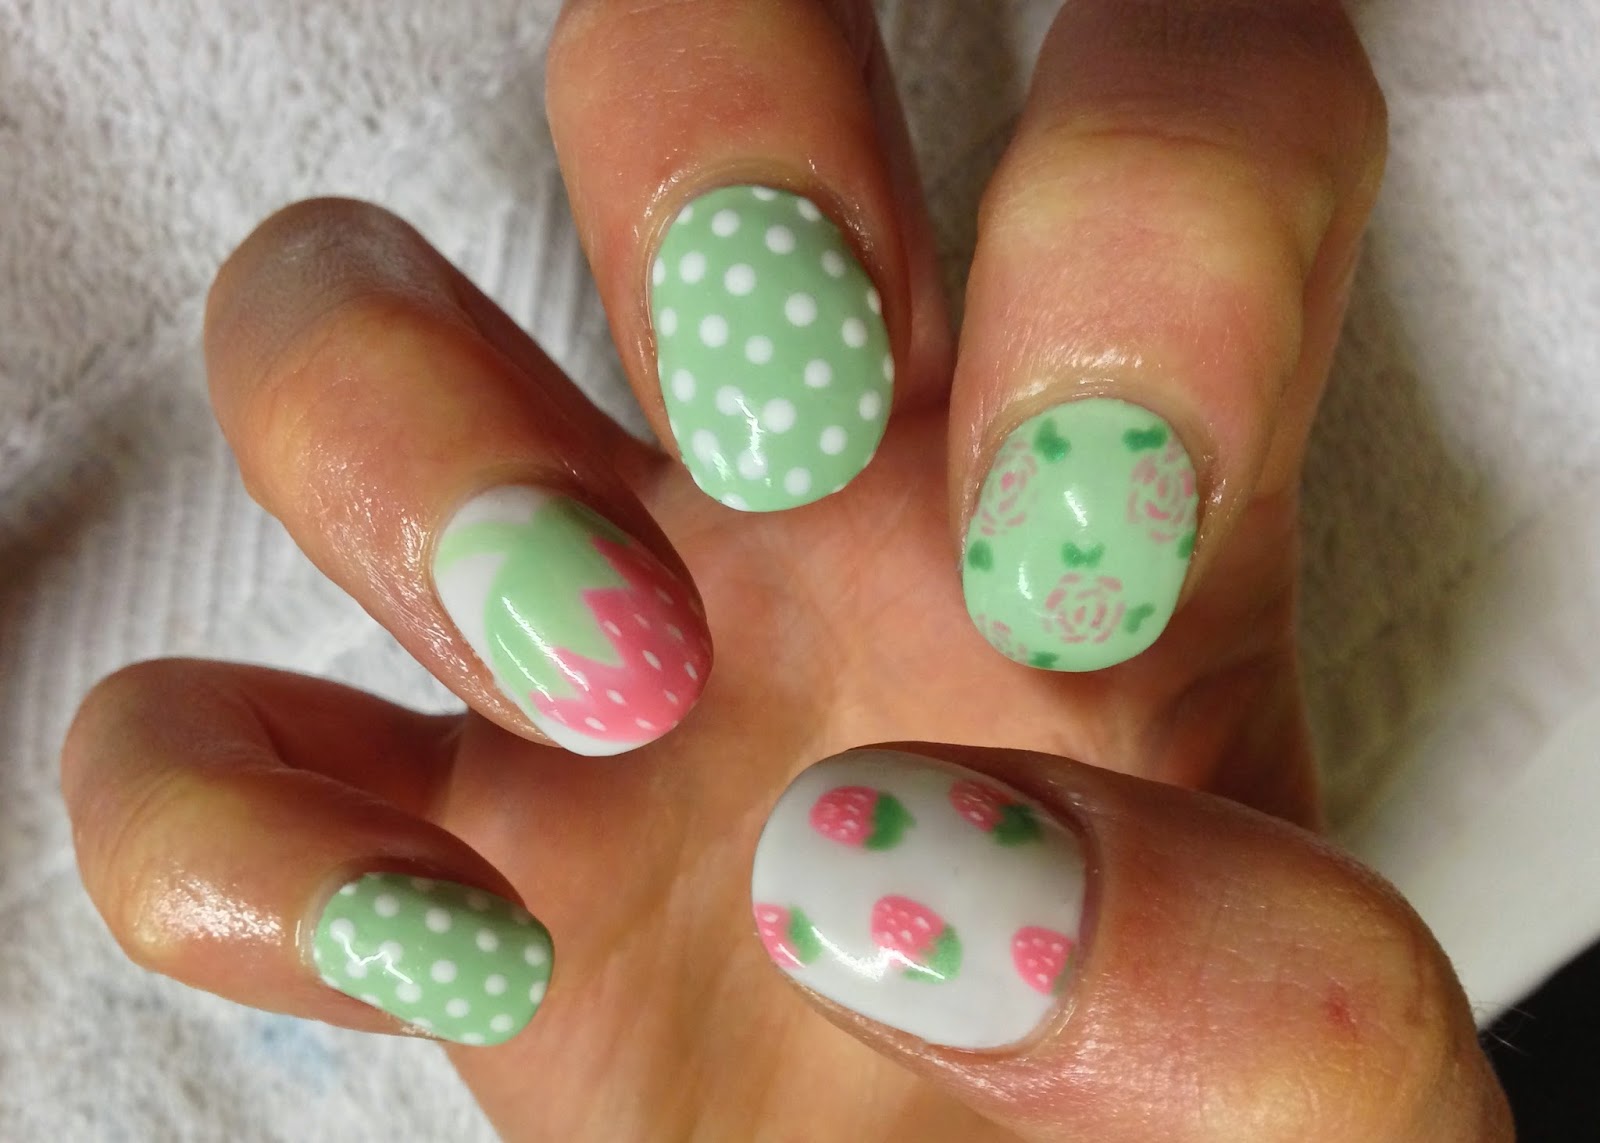
Becca wanted to change it up slightly and add a little bit of floral, so we swapped a couple of the designs onto different fingers and added a rose pattern too.

The colours we used were all CND Shellac:
white - Cream Puff or Studio White
pink - Gotcha
pale green (base) - mixture of Limeade and Cream Puff
darker green (rose leave, strawberry stems) - Limeade


The floral design was done in Gotcha over the Limeade/Cream Puff base mix and I used Limeade to add little green leaves.

The polka dots were done in Cream Puff over the Limeade/Cream Puff base mix.

The large strawberry was painted over a Studio White base using the Limeade/Cream Puff mix and Gotcha with Cream Puff for the seed detail . And the small strawberries were the same, but I used Limeade for the stalk to make them more defined.

And there you have it, super summery strawberry nails :)


Disclaimer - All products used for this manicure were bought myself, for more info about myself and CND Shellac please check out my disclaimer page here. Once you Shellac you never go back!

Sunday, 7 July 2013

CND Shellac Nail Art - Cath Kidston Blue


One of my most liked and commented manicures came earlier this year with some Cath Kidston inspired nail art from the very talented missgoob on instagram (@missgoob).

If you are a regular reader I'm sure you would have seen the post, but if not then check it out here. My friend Kate loved it so much that she wanted the same design but in a pale blue, and what better blue to do the job than Azure Wish from the new Sweetdreams collection.

Everything was used in pretty much the same way as the last post with just the base colour change.
white - Cream Puff
blue - Azure Wish
pink (on rose detail) - Rosebud
pale pink (on rose detail) - mixture of Rosebud and Cream Puff
green (rose leaves) - mixture of Pretty Poison and Hotski to Tchotchke

(For more info on how to do this design yourself and the original design from missgoob please read the original post)

Which do you prefer? The pink or the blue?
Disclaimer - All products used for this manicure were bought myself, for more info about myself and CND Shellac please check out my disclaimer page here. Once you Shellac you never go back!

Saturday, 6 April 2013

CND Shellac Nail Art - Pink Polka Dots


They're still a little dotty for polka dots when it comes to manicures at the moment. So I just thought I'd share this quick colour combo with you...

This is Rachel (again!) and much like Jess (on my previous polka dot mani here) loved the simple yet detailed look of a few dots. Except Rachel likes the bright and thus opted for this Minnie-Mouse-esque colour scheme with Hot Pop Pink and Cream Puff.

The second photo shows the colours with flash, because without it you just can't quite get the bold bright hue of the pink.

She told me that she got loads of compliments on these and some people accused her of having stickers - when she tried to insist they were hand painted, they still wouldn't believe her!! Well, people just don't seem to appreciate true nail-artistic talent these days do they??!

(I mean, seriously though, it's not that hard to use a dotting tool!?!)


Disclaimer - All products used for this manicure were bought myself, for more info about myself and CND Shellac please check out my disclaimer page here. Once you Shellac you never go back!

Saturday, 30 March 2013

CND Shellac Nail Art - Monarch Butterfly in pink


Oh I do love a challenge and this is one of my favourite nail art designs that I'm asked to recreate. Laura, a friend of a friend, saw my last Monarch Butterfly design and asked if I could do this for her but in pink.

So we swapped the green for pink and voila! The colours we used for this one were CND Shellac Tutti Frutti, Blackpool and Cream Puff. If you check out my last post on this design, there's plenty of details on how to do this look yourself along with a handy link to a youtube tutorial video.

But credit really must go to Michèle from her old blog Lacquerized for her original manicure design. Although she doesn't blog much nowadays, you can find her on twitter under @MicheleNL

Disclaimer - All products used for this manicure were bought myself, for more info about myself and CND Shellac please check out my disclaimer page here. Once you Shellac you never go back!

Sunday, 24 March 2013

CND Shellac Nail Art - Purple Polka Dot


So it seems everyone has gone dotty for polka dots! This is Jess, you've yet to meet her, but she fancied a little shellacing that wasn't quite as bright as the rainbow dots from my last post.

She opted for a simple contrast of grey and purple which worked really well. We used a base colour of CND Shellac in Cityscape and then I used my dotting tool to add polka dots in Rock Royalty. On the ring finger we swapped the colours round to add an accent nail.

Totally dot-tastic don't you think?! :)

Disclaimer - All products used for this manicure were bought myself, for more info about myself and CND Shellac please check out my disclaimer page here. I might not be a professional, but I sure love me some Shellac nail art :)

CND Shellac Nail Art - Rainbow Polka Dots


Maddie went polka dot crazy last month and what better way to go all dotty than in a rainbow showcase of Shellac! You last saw Maddie with her Iridescent Ice Queen nails so she's firmly bucking her normal French trend at the moment.

To create this look we used a base colour of CND Shellac in Studio White - not quite as harsh as Cream Puff which mostly just looks like you've 'tippex-ed' your nails (or 'wite-out' if your from across the pond). Then using my CND dotting tool, I added polkas dots to each nail and we kept the colours matching on each hand.

Thumb - Silver Chrome, Index Finger - Hotski to Tchotchke, Middle finger - Purple Purple, Ring finger - Red Baroness, Little finger - Tutti Frutti.

The hardest colours to 'polka dot' were the metallics (silver and green) as the metallic sheen collected together so the dots appeared less smooth - but the easiest was the red, in general I think Red Baroness is a dream to work with.

It was sealed in with a bit of top coat and there you have it - colour crazy dots. It seems that everyone is going a bit polka dot crazy as I've already repeated this design in other colour variations - so stay posted!


Disclaimer - All products used for this manicure were bought myself, for more info about myself and CND Shellac please check out my disclaimer page here. I might not be a professional, but I sure love me some Shellac nail art :)

Sunday, 10 March 2013

CND Shellac Nail Art - Cath Kidston Cuteness


Hello and happy Sunday people! The weather has been so un-Spring like that I thought it about time I got round to some very Spring suitable nails to cheer us up. The kind hand model for the occasion is (obviously) Stacey and after the popularity of her black bow French manicure on my instagram (@brushupmakeup), she decided to beat her record with these babies.

The design came from missgoob on instagram (@missgoob) - a very talented nail artist and cupcake extraordinaire! The original design that inspired me was this one (link):

missgoob used OPI Mermaid Tears for this design
(photo courtesy of @missgoob on instagram)
Stacey loved the Cath Kidston style of this but of course, CND Shellac is limited in it's greens, so we went pink instead and changed up which design went on which fingers.

The colours we used were all CND Shellac:
white - Cream Puff
pink - Rosebud
pale pink (on rose detail) - mixture of Rosebud and Cream Puff
green (rose leaves) - mixture of Pretty Poison and Hotski to Tchotchke


The floral design consisted of two coats of Cream Puff for an opaque white base (curing after each), then rough 'blobs' of Rosebud for the roses which I added pale pink detail to before curing, then the green leaves came last and were cured before topcoat.

The polka dots were done over two coats of Rosebud (curing after each) and made from a dotting tool and Cream Puff, cured, and finished off with topcoat.

The middle finger was simply two coats of Rosebud (curing after each) and two placed diamantés - one 1.5mm round and one 2mm square (from Viva la Nails) turned on its side - before adding topcoat.

And there you have it, nails Cath Kidston would be proud of and last an amazing two weeks :)

Disclaimer - All products used for this manicure were bought myself, for more info about myself and CND Shellac please check out my disclaimer page here. I might not be a professional, but I sure love me some Shellac nail art :)

Sunday, 30 December 2012

CND Shellac Christmas Nail Art - #3 Blue Glitter Fade & Snowflakes


Blue glitter and Cream Puff can only mean one thing... more snowflakes! Here's another Christmas nail art design for you, in Shellac of course. As modelled by the one and only Stacey (duh??!).

Stacey wanted something much more festive for Christmas but would also carry her through to New Year. So naturally we went straight for the glitters. Now the layers to this are quite complex, so bear with me :)

Firstly I painted a coat of Studio White as a base colour, cured, then added a coat of a glitter paste (made up of Moonlight and Roses mixed with an iridescent white glitter) over the top and cured again.

I then mixed up a different glitter paste of Zillionaire, Gosh Nail glitters in Silver and Blue Sapphire, CND Glitter Additives in Blue and Silver Holographic in my palette. I painted the blue glitter paste in a glitter fade from the cuticles down, so that the white at the tip looked almost like a snowy landscape along the nail, and cured.

Finally, I used a small detailer brush and my Cream Puff to create star like snowflakes and a dotting tool to add the snow. I cured the white, added top coat, cured for one last time (180 seconds though this time due to all the layers) and voila!

Glittery blue Christmas/New Year nails, done.

Disclaimer - All products used for this manicure were bought myself, for more info about myself and CND Shellac please check out my disclaimer page here. I might not be a professional, but I sure love me some Shellac nail art :)
Related Posts Plugin for WordPress, Blogger...