Showing posts with label Shellac layering. Show all posts

Sunday, 30 December 2012

CND Shellac Christmas Nail Art - #4 Iridescent Ice Queen


Iridescent Ice Queen  - glitzy enough for both Christmas and New Year. These are Maddie's, you haven't seen her since here as she is usually favouring the classic French, but for this Winter she wanted to glam it up a little more.

We opted for one of her favourite colours - Moonlight and Roses, but to make it stand out a little more we used some Studio White underneath. If I remember correctly it was one coat of Studio White then two of Moonlight and Roses (curing for 120 seconds after each). I then mixed up a glitter pastes of Mother of Pearl, Gosh Nail Glitter in Silver, some white iridescent nail glitter and CND Additive in Spectrum Shimmer. I placed a piece of striping tape diagonally across each nail - to get a nice crisp line - and painted the glitter paste on the cuticle side of the diagonal. I carefully removed the striping tape and then cured before adding top coat and curing one last time (probably for 180 seconds due to the number of layers).

Apologies for the grow out in these photos, I forgot to take one when I first did them and didn't see Maddie for another week or so after, so these are actually about a week and a half old - still shiny and chip free!!


Disclaimer - All products used for this manicure were bought myself, for more info about myself and CND Shellac please check out my disclaimer page here. I might not be a professional, but I sure love me some Shellac nail art :)

Thursday, 23 August 2012

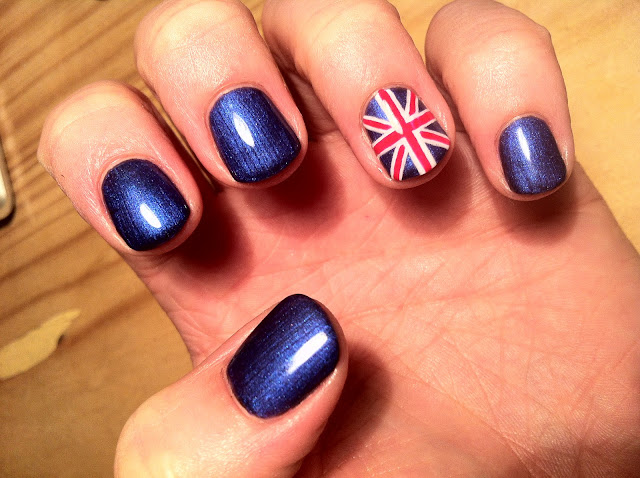
CND Shellac Nail Art - Union Jack


So the Olympics may now be over, but it didn't stop me celebrating a little of Team GB on my nails during the weeks of sporting events. I'd been lulling it over in my mind and trying to work out how I could represent GB Shellac style - after all, CND were the nail ambassadors for the athletes this year!

In the end, I went for the look above - not bad eh? And yes, my ring finger is entirely handpainted and I used NO tape to make my edges straight - proud doesn't even begin to cover it :)

For the base colour I layered Purple Purple over Blackpool to create the gorgeous Royal Blue metallic base. Then after curing, on the ring finger I painted Cream Puff in the criss cross shape of the Union Jack, cured, then painted the red criss cross shape on top using Wildfire. I sealed it all in using top coat and there you have it, a beautiful Union Jack!

To paint the Union Jack detail I did opt to use my tiny Orly Detailer brush rather than the Shellac brushes in the bottles (they were too thick) and I promise you, there wasn't a single piece of striping tape in the vicinity of this manicure.... what do you think?
 
Disclaimer - All products used for this manicure were bought myself, for more info about myself and CND Shellac please check out my disclaimer page here. I might not be a professional, but I sure love me some Shellac nail art :)

Thursday, 16 February 2012

CND Shellac Nail Art - Shellac Layering, Diamanté & Striping Foil

Wow, another one I'd forgotten about. Today seems to be the day for long lost manicures!

This is one that I did on my other sister about 2-3 months ago. She fell in love with Shellac Iced Coral when I bought it and opted to layer it with Studio White to make it a more solid colour. Oh, and I then went nail art crazy on her ring finger to make it more interesting!


After prepping the nails and applying the base coat (and curing for 10 seconds) I applied one coat of Studio White and cured for 120 seconds, then one coat of Iced Coral over the top and cured for 120 seconds. Then I placed two strips of gold striping foil diagonally across the ring fingers and some diamantés diagonally too, in the sticky layer. I finished by applying top coat and cured for 120 sec. Voila!


What do you think? Let me know your thoughts.

Sunday, 18 December 2011

CND Shellac Nail Art - Glitter Fade & Shellac Layering

Well last weekend was time for Nat's fourth CND Shellac manicure and low and behold, the glitter hater wanted more glitter! So a glitter fade was the obvious choice and perfect to make her nails a little more Christmassy!

She chose a blue this time, a result of some clever Shellac layering with Blackpool and Purple Purple. And glitzed it up with a silver glitter fade and some snowy nail art:


For the main Shellac colour I used the 'layering' technique - of applying two different Shellac colours to create a new colour. I used first a coat of Blackpool and then a coat of the Purple Purple, from their 6 new 2011 colours, curing for 120 seconds between each coat. The result was a purple toned blue, that looks a bit more Royal blue in photos (as above and below).

For the nail art I did a simple glitter fade with a glitter paste of Shellac Zillionaire and Gosh Nail Glitter in 01 Silver. And on the accent nail, I used my Orly dotter tool, at the smaller end, to dot some 'snow' onto the nail in Shellac Studio White.


Above photo - the base colour formed from 'layering'
Right photo - the finished result

Nat loves them! Another glittery idea for your nails, perfect for Christmas!

I want to experiment a little more with Shellac layering and I hope to do a post with some of the colour combinations, in the future, but I still need to invest in a few more basic colours, like Fedora and Tutti Frutti first... when the budget allows of course!


What do you think? Have you tried a Shellac layering before? What colour combinations have you tried?
Related Posts Plugin for WordPress, Blogger...