Showing posts with label Nail Art. Show all posts

Sunday, 26 January 2014

CND Shellac Nail Art - Diagonal French and Polka Dots


Aaaah, it feels good to get back into the nail-art-swing of things. I kick-started the 2014 nail art with Rachel (best known for these and these) and a take on one of cutepolish's designs.

If you haven't already come across cutepolish (where have you been hiding?!) then check out her YouTube channel, her Instagram and her Twitter to keep up to date on loads of fabulous nail art ideas and how-to's.

Rachel brought the design to me from a google search and after a little more hunting it didn't take me long to find it on cutepolish's channel - http://www.youtube.com/watch?v=KXd_nxlEuKA


We changed it up slightly though - pink dots on a white tip and a lilac glitter line instead of purple - and recreated it in CND Shellac of course. So what colours did I use?...

After base coat I used one coat of Negligee then two coats of Cream Puff for the diagonal French tip.

To get an even line on all nails I used striping tape to guide me for the line on the first coat of white so all nails looked roughly the same - don't forget to remove the tape before curing! - and then I free-handed the second coat of white over the top. It doesn't matter if the line isn't that neat as you will go over it with glitter in a little while.

After curing the white I used a medium/large ended dotting tool to add polka dots in Pink Bikini (if you don't have a dotting tool, the end of a hair grip is a similar size). Once the dots were cured I then added a lilac glitter line - using a glitter paste of Mother of Pearl and Gosh nail glitter in 13 Topaz Lavender - cured the glitter and finally added top coat.


What do you think?

Most Gosh Nail Glitters are available from Superdrug in the UK for £4.99 (only the 02 Gold is online, the other colours are all in store). 


Disclaimer - I be not professional, just well practised but if you want more info about my CND Shellac hobby obsession then check out my disclaimer page here. What's not to like about a manicure that actually lasts?!

Monday, 30 December 2013

CND Shellac Christmas Nail Art - #10 The Reinvented French


And it's the last Christmas manicure of the season. Simple yet effective with a reinvented french manicure for Jene. She opted for a simple clear, nude base and two suitably festive colours on her tips.

I used one coat of Negligee for the base colour (after base coat) and then with a bit of striping tape help, I created a diagonal along one edge with Sugared Spice. Make sure you remove the tape before curing! I did three coats of the Sugared Spice in the end - the second two coats I did freehand once the tape had given me a nice clean edge to work from. I then repeated the process, three coats, in Tinted Love on the other side of each nail. As you can see in the top photo, I alternated the colours on each hand - like a mirror image.

Subtly Christmassy don't you think? Next up is New Year's nails.... oh how 2013 has flown by!
Disclaimer - I purchased all the products used for this manicure myself, and if you want more info about myself and CND Shellac then check out my disclaimer page here. What's not to like about nail art that actually lasts?!

CND Shellac Christmas Nail Art - #9 Turquoise Trinkets


Yup. Turquoise was most definitely the colour of choice this month. Much like Kate's manicure here, Stacey was completely taken with the green sparkle and opted for the same glitter but a slightly different design for her Christmas nails.

The lace effect on Stacey's ring fingers and thumbs (not pictured) were a design that I spotted on Lindsey's instagram (@wondrouslypolished) - you can check out her full blog post on her design, plus the more intricate thumb detail she did, here.

photo from @wondrouslypolished on instagram
To recreate this in CND Shellac, I painted all nails with one coat of Hotski to Tchotchke. I then added another two coats to the ring finger and thumb (it's just slightly too sheer in only two coats I think) and added two coats of a turquoise glitter paste to all other fingers. The turquoise glitter paste was made up of Mother of Pearl and Gosh Nail Glitter in 09 Turquoise. I then added top coat to all fingers and cured.

Now for the important bit, to create the lace pattern on the ring finger/thumb, do not remove the tacky layer! Using a brush, buff the CND Additive Pigment Effect in Blush Bronze Frost into the tacky layer, completely covering the nail and don't worry if you make a little mess around the cuticles. Then using top coat and a small detailer brush, paint the lace pattern on top. I used a dotting tool to add the dots, but be very careful to not accidentally scratch off the pigment that's stuck to the tacky layer. Cure the top coat pattern and after this final cure, remove the tacky inhibition layer - this will remove all the excess pigment that's not been sealed into the pattern.

Ta dah! What do you think? The additive is actually a lot more rose gold than bronze as pictured, it worked so well with the turquoise. I love this technique and can't wait try out some more pigments in this way. Take a look at www.chickettes.com for some more inspiration, especially her video here - I can't wait to give rainbow polka dots a go...
Disclaimer - I purchased all the products used for this manicure myself, and if you want more info about myself and CND Shellac then check out my disclaimer page here. What's not to like about nail art that actually lasts?!

CND Shellac Christmas Nail Art - #8 Rudolph and Gingerbread Men

It seems that Ruby Ritz well and truly made a comeback this season. With its re-release as part of a duo with Wildfire it was a natural choice for many to get that glitzy Christmas manicure - including myself!

Natalie took one look at my manicure and decided that was the colour for her, but she one step further and challenged me to some appropriately festive characters...


These two, adorable, designs were inspired by a couple of google images that Natalie had found. After a bit more research, I found the sweet little gingerbread man stitched to this cute cushion from Miss Shelley Designs at notonthehighstreet.com.

Gingerbread Man Cushion from notonthehighstreet.com £25
And Rudolph is actually a tutorial from the talented Joya's tumblr page (aka Blanket Print Nails). You can see here full post here.

tutorial by Joya at blanketprint.tumblr.com
To recreate this manicure in CND Shellac I used:

Red nails - one coat of Red Baroness followed by one coat of Ruby Ritz
White base colour for the characters - two coats of Studio White followed by one coat of Silver VIP Status
(the light brown used for the gingerbread man and Rudolph is made from a mixture of Faux Fur and Cocoa)
Gingerbread man - two coats of the light brown mixture in the shape of the gingerbread man, then use a dotting tool to add eyes in Faux Fur and buttons in Cream Puff, then the bow tie is one like the red base colour on the other nails (Red Baroness and Ruby Ritz)
Rudolph - follow the tutorial above (making sure to cure between each colour application) using the light brown mix for Rudolph, Faux Fur for the antlers, Cream Puff and Blackpool for the eyes, Red Baroness and Ruby Ritz for the nose.

All nails were finished with a layer of top coat and voila! What do you think? I can't decide if Rudolph or the Gingerbread man is my favourite...


Disclaimer - I purchased all the products used for this manicure myself, and if you want more info about myself and CND Shellac then check out my disclaimer page here. What's not to like about nail art that actually lasts?!

CND Shellac Christmas Nail Art - #7 Charmed Collection Dotticure

Back in October I posted about the new CND Shellac limited edition Christmas 'Charmed' collection and as I'm sure you all guessed, it didn't take me long to add them to my stash! Then the perfect opportunity came to try them all out.... Check out these beauties:


This is Maddie and her Christmas manicure of choice for 2013 or should I say 'dotticure'. We were inspired by a design from Hannah at The Nail Trail that she did in OPI nail polish (I think!):

photo from @thenailtrail on instagram
Although I can't find the design on her website, it was on her instagram (@thenailtrail) and you can find the exact post here or here.

To recreate this in CND Shellac we managed to use the entire Charmed collection, plus a few others:
The base colour is two coats of Studio White followed by one coat of Silver VIP Status.
The dots for the Christmas tree are Frosted Glen and Serene Green and the dots on the other nails are Frosted Glen, Serene Green, Scarlet Letter, Ice Vapor and Tinsel Toast. To create the different sized dots I used two different dotting tools - the Orly Dotter Duo and CND dotting tool that came with the original additives kit.
To the top of each Christmas tree I added silver star glequin from the Born Pretty Store and I finished off by adding top coat.


This is hands down, one of my favourite (if not the favourite) Christmas designs so far! What do you think?
Disclaimer - I purchased all the products used for this manicure myself, and if you want more info about myself and CND Shellac then check out my disclaimer page here. What's not to like about nail art that actually lasts?!

CND Shellac Christmas Nail Art - #6 Turquoise Twinkle


The glitter's out in full force for this one (and turquoise was quite a popular colour choice this year too it seems). Kate's request was for a little Christmas art, so she decided on a tree and a present design for the middle and ring fingers and the thumb (not pictured) whilst her first and little finger were just glitter.

For the first and little fingers I used 2 coats of Hotski to Tchotchke and then 2 coats of a turquoise glitter paste - I mixed together Mother of Pearl and some Gosh Nail Glitter in 09 Turquoise.

The thumb, middle and ring fingers were a little more tricky! As Kate wanted a gold glitter detail, I decided to use an engraving effect that I had seen used before by Holly Schippers (Fingernailfixer). I applied 2 coats of Tinsel Toast, then after curing, added 1 coat of Hotski to Tchotchke. Before curing this, I used a dotting tool to engrave the pattern I wanted on each nail and once happy I then cured that coat. I then used 1 coat of the turquoise glitter paste from the other nails to go over the nail art, re-engraved the pattern, cured again and then finished with top coat.

A little tricky but I like the overall effect of the engraving, I think I might have a little play around with that technique...

Most Gosh Nail Glitters are available from Superdrug in the UK for £4.99 (only the 02 Gold is online, the other colours are all in store).

What do you think?

Disclaimer - I purchased all the products used for this manicure myself, and if you want more info about myself and CND Shellac then check out my disclaimer page here. What's not to like about nail art that actually lasts?!

CND Shellac Christmas Nail Art - #5 French and Gold

The festive season called for many a glittery mani and I thought I best get my butt in gear to show you some of the designs I've done for various Christmas manicure requests. If you follow me on instagram then you will have spotted the pictures in the next few posts already, so apologies for the repeats!


A classic French manicure I could probably do with my eyes closed (well not exactly, but you get my drift!) so those who are partial to a nice crisp white tip often opt for a bit of glitter to spice it up for Christmas. Typically gold or silver is most requested, and above is the gold version. I do a french manicure as normal (above is 1 coat of Negligee and 2 coats of Cream Puff) and then paint on a glitter line with a fine detailer brush, before finally adding top coat.

For the gold - mix up a glitter paste of Tinsel Toast and some Gosh Nail Gitter in 02 Gold to give the glitter a bit more 'oomph'. You could also use Gold VIP Status as a mixer if you wished.

To make a silver - mix up a glitter paste of Silver VIP Status or the new Ice Vapor with some Gosh Nail Glitter in 01 Silver.

For other glitter colours, you could also use Zillionaire or Mother of Pearl as a mixer. Most Gosh Nail Glitters are available from Superdrug in the UK for £4.99 (only the 02 Gold is online, the other colours are all in store).

Enjoy!

Disclaimer - I purchased all the products used for this manicure myself, and if you want more info about myself and CND Shellac then check out my disclaimer page here. What's not to like about nail art that actually lasts?!

Wednesday, 30 October 2013

CND Shellac Nail Art - Halloween Mix'n'Match


Good old Gemma. I can always rely on her to test my nail art capabilities! Her penguin mani from last Christmas is still one of my favourite designs to create (here) so of course this Halloween she went all themed out, with some glitter too of course!

As a base colour I used Asphalt and then I added a dark grey glitter paste to her middle and little finger (made up of Silver VIP Status, Gosh 03 Grey Moonstone and Gosh 01 Silver Nail Glitters). After curing, I painted the cobwebs and spider with Cream Puff and two little Blackpool dots for the spider's eyes.

The little pumpkin (my favourite I think!) was made up of two different glitter pastes. The green stalk was Silver VIP Status and Gosh 08 Emerald Green (not available in the UK) and the pumpkin was Silver VIP Status and Gosh 04 Fire Opal (also not available in the UK). I used a very small dotting tool to create the curved vertical lines down the pumpkin before I cured the glitter, then after curing used some Blackpool to add the eyes and mouth.

On her thumb, she simply had the orange glitter paste used for the pumpkin.
 

Most Gosh Nail Glitters are available from Superdrug in the UK for £4.99 (only the 02 Gold is online, the other colours are all in store). Although two of the colours here I had to purchase from the states as they never released them here.

Disclaimer - I purchased all the products used for this manicure myself, and if you want more info about myself and CND Shellac then check out my disclaimer page here. What's not to like about nail art that actually lasts?!

Sunday, 28 July 2013

CND Shellac Nail Art - Pink Glitter Chevrons


Tis the season for weddings! Here's another wedding related manicure, this time for Natalie.

She wanted simple art so opted for a bit of glittery goodness with some chevrons and rockstar nails. The pale pink colour is Romantique and the glitter is a mixture of Mother of Pearl and Gosh nail glitter in Rose Quartz (Gosh nail glitters are available in Superdrug stores).

To create the sharp lines of the chevrons I used some striping tape (from eBay) and I did 2-3 coats of the glitter to make sure it was truly opaque.

I find that Romantique can be a bit patchy on only two coats, so most of the nails you see here have had at least 3 thin coats - as you can see they still aren't truly opaque though.

What do you think?


Disclaimer - All products used for this manicure were bought myself, for more info about myself and CND Shellac please check out my disclaimer page here. Once you Shellac you never go back!

Friday, 26 July 2013

CND Shellac Nail Art - Purple Chevrons


You might have spotted my current manicure (above) on my instagram last weekend - this was another inspiration idea taken from a couple of my favourite instagrammers for nail art ideas.

The exact design I found was one of Hannvjk's (below) also known as @polishcandies who took the famous 'chevron' design from Selena at @selenadee_nails

Hannvjk used Essie brooch the subject, a neon pink from Claire's and China Glaze I'm not a lion for this design
(photo courtesy of @polishcandies on instagram)
I love her neon and nude combination, but until Shellac create a good nude, that combination isn't going to work for me. So I went purple and silver instead.

The colours I used were Lilac Longing, Grape Gum, and a Gosh nail glitter in Silver (available from Superdrug stores).

For the glitter on the middle finger and thumb, I mixed the Gosh glitter with Shellac in Mother of Pearl and applied 3 coats so it was truly opaque. For the other fingers, I used a base of Lilac Longing (again 3 coats) and then Grape Gum for the dots and chevron detail.

And yes, those chevrons were handpainted.... bloody difficult to paint my right hand too!


What do you think? I'm already thinking how I can mix up the colour combo for next time...
Disclaimer - All products used for this manicure were bought myself, for more info about myself and CND Shellac please check out my disclaimer page here. Once you Shellac you never go back!

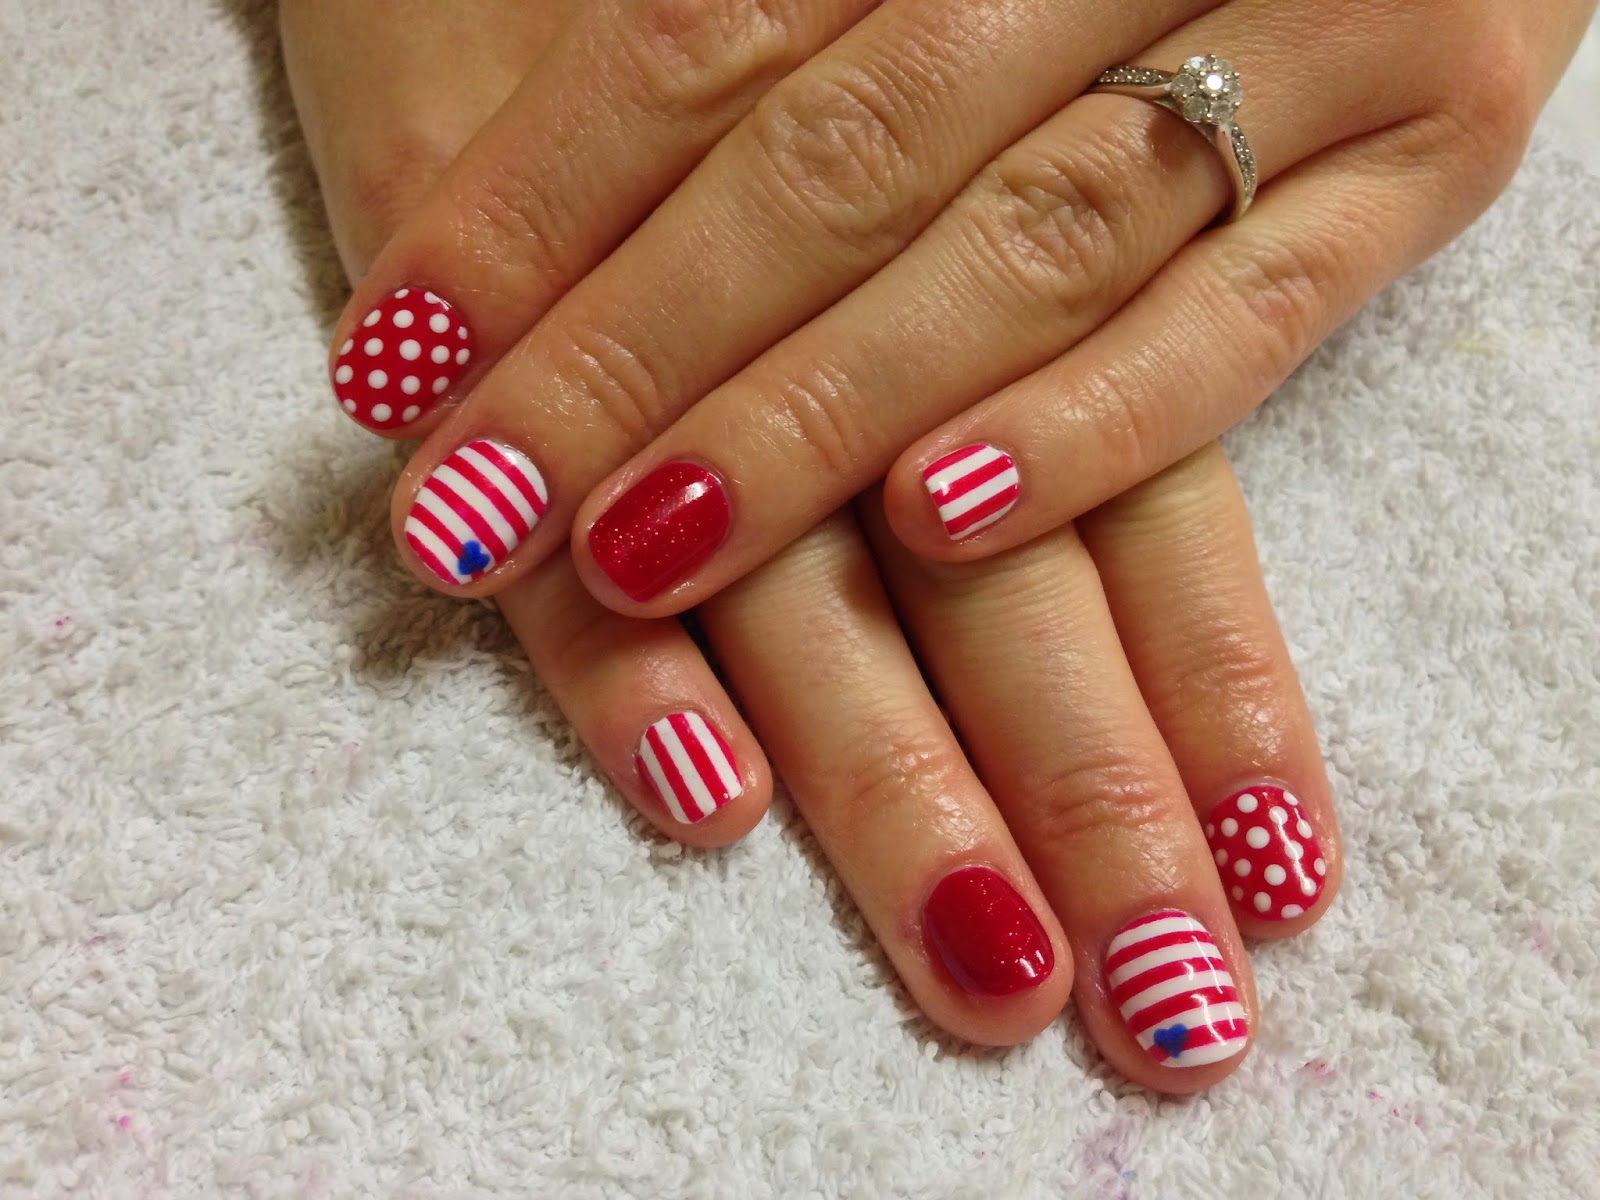
CND Shellac Nail Art - Nautical Nails


Aye aye Cap'n! You may have spotted me donning a rather nautical themed outfit and hat a couple of weeks back on my instagram. They were in aid of my friend Rachel's nautical themed hen party, ahead of her impending nuptials at the end of August.

So of course for the hen's nails, she needed something truly appropriate to the theme. And not just one design, she went all out with a mix'n'match red and white theme.


The colours I used to create this were Hollywood, Ruby Ritz, Cream Puff and Water Park.
It's probably easiest if I breakdown what I did on each nail individually:
Thumb - Hollywood with two 1.5mm round gold studs (from eBay)
Index - Hollywood base with Cream Puff polka dots
Middle - Cream Puff base, horizontal stripes in Hollywood and a blue heart in Water Park
Ring - Hollywood base with Ruby Ritz over the top
Little - Cream Puff base and vertical stripes in Hollywood

To create the stripes I cheated a little and used some striping tape (from eBay) as a stencil and the polka dots were just done with a small dotting tool. The heart was free handed using my dotting tool and a small detailer brush.

What do you think?

Disclaimer - All products used for this manicure were bought myself, for more info about myself and CND Shellac please check out my disclaimer page here. Once you Shellac you never go back!

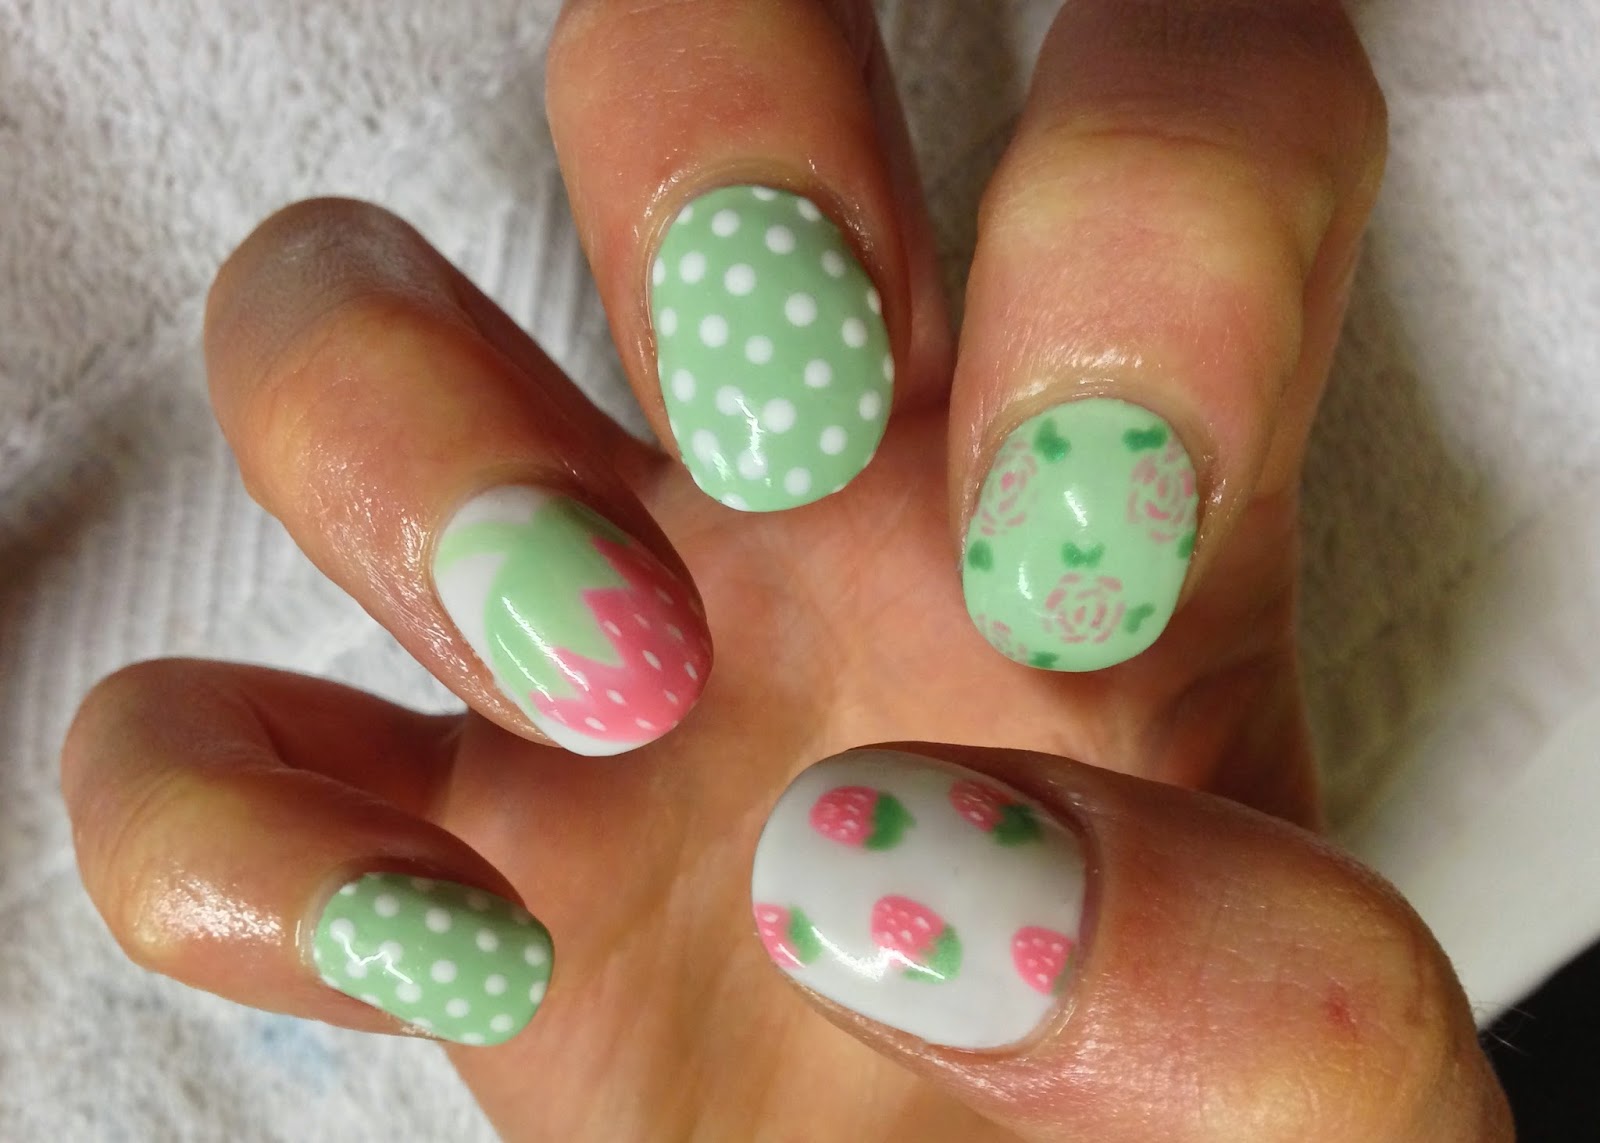
CND Shellac Nail Art - Strawberry Roses


Happy Summer Holidays people! Now that school's out for the Summer I can get on with showing you some of the more recent nail art adventures I've been on. If you follow my instagram (@brushupmakeup) you may have spotted this manicure a couple of weeks back. This is Becca and she likes to challenge me on the odd occasion....

Becca picked out a design she's seen from the lovely chorubim on instagram (@chorubim) - a very talented nail artist and swatcher who has the neatest set of talons I have ever seen! The original design that inspired me was this one (link):

chorubim used Zoya Neely, OPI MVIB and Wet'n'Wild Tickled Pink for this design
(photo courtesy of @chorubim on instagram)
  
Becca wanted to change it up slightly and add a little bit of floral, so we swapped a couple of the designs onto different fingers and added a rose pattern too.

The colours we used were all CND Shellac:
white - Cream Puff or Studio White
pink - Gotcha
pale green (base) - mixture of Limeade and Cream Puff
darker green (rose leave, strawberry stems) - Limeade


The floral design was done in Gotcha over the Limeade/Cream Puff base mix and I used Limeade to add little green leaves.

The polka dots were done in Cream Puff over the Limeade/Cream Puff base mix.

The large strawberry was painted over a Studio White base using the Limeade/Cream Puff mix and Gotcha with Cream Puff for the seed detail . And the small strawberries were the same, but I used Limeade for the stalk to make them more defined.

And there you have it, super summery strawberry nails :)


Disclaimer - All products used for this manicure were bought myself, for more info about myself and CND Shellac please check out my disclaimer page here. Once you Shellac you never go back!

Sunday, 7 July 2013

CND Shellac Nail Art - Pink Bikini Glitter Fade


Last one for this weekend. A good old glitter fade for Stacey using Pink Bikini. For a newly released colour (see this post) I'm a little surprised that I've not had many requests for this shade yet?!

Stacey wanted a glitter fade like her Autumnal nails from last year (here) but in Summer colours of course! So we had a little play around with my glitters to see which would work best. In the end she opted for Gosh Nail Glitter in Rose Quartz and some pale pink glequins from the Born Pretty Store.

Much like her Autumn nails, this one was quite simple to create - base coat and two coats of colour in the normal Shellac fashion - then a glitter fade using a glitter paste and finished off with top coat. The glitter paste was made from a mixture of CND Shellac in Mother of Pearl, Gosh Nail Glitter in Rose Quartz (available from Superdrug stores) and the pale pink glequins.

Et voilà! Pretty pink nails.
Disclaimer - All products used for this manicure were bought myself, for more info about myself and CND Shellac please check out my disclaimer page here. Once you Shellac you never go back!
Related Posts Plugin for WordPress, Blogger...